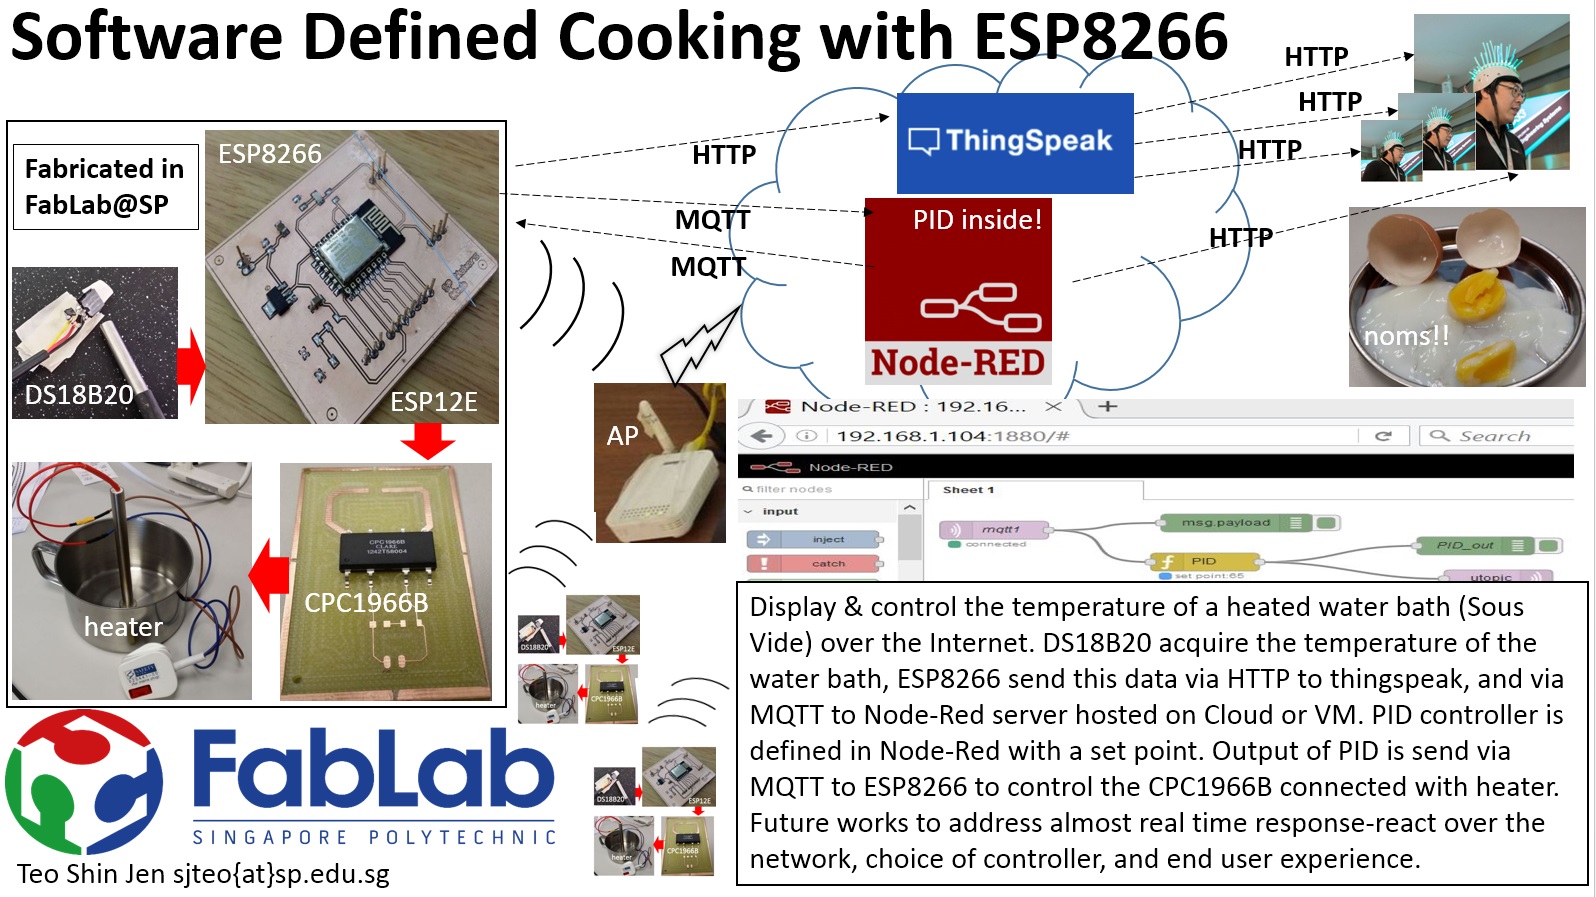
Sous Vide sur Internet: Node-RED, MQTT, ESP8266
Cooking over the Internet has always been my pet peeve. That is when I could marry two of my best loves, maybe into a product that pays. Sous Vide sur Internet, is in French, loosely translated to sous vide over the Internet. well, it doesn't takes much of my agar-logic to get the translation.
Just a little bit of trivia:
Back in 2010, 2 of my padawans are working on a Final Year Project making a web2.0 smart fridge that tracks item in the fridge by QR code follow by suggesting a youtube cooking video based on the items in the smart fridge. When DIY Sous Vide is all the rage on the Internet, I have my own fair share of experiments with sous vide with a myriad of implementations. Back in 2012, one of my padawans took it up the challenge to build a sous vide shield for arduino
http://shin-ajaran.blogspot.sg/2012/12/coming-to-end-of-2012.html.
Fast forward to 2016, The notion of Internet Enabling dumb devices aka household appliances is all in the rage. The release of ESP8266, a very cheap (USD4 at Dec2014) WiFi enabled microcontroller has kick start a whole plethora of IoT devices fuelling the development of devices once seem dumb. The
Maker's IoT Kit and the detail step by step guide on how to use ESP8266, maker IoT Kit break out board with arduino IDE located here
http://shin-ajaran.blogspot.sg/2015/11/makers-iot-kit-for-esp8266-esp-01.html is one such enabler to make dumb terminals smart by connecting to the Internet.
Having the ESP8266, the
Maker's IoT Kit for ESP8266 is only one third of the whole picture of the end to end IoT solution.
The complete end to end IoT solution will have 3 parts,
1. the Internet Enabled device with sensors
2. the computing and data aggregation platform aka cloud computing
3. the visualization over the Internet
Earlier, the Internet Enabled sensor was addressed in this post in detail
http://shin-ajaran.blogspot.sg/2015/11/makers-iot-kit-for-esp8266-esp-01.html. The visualization of data was addressed in an earlier post too
http://shin-ajaran.blogspot.sg/2015/09/stream-iot-sensor-data-esp8266-nodemcu.html, via thingspeak.
The computing and data aggregation platform is the gist of this guide. In the earlier post, the protocol of chose to stream data is via HTTP. There are pros & cons associated with this protocol in the implementation of IoT end to end solution, this post is not going to delve deep into the discussion of it. Assuming there are 1000000 IoT devices, quite chatty (in terms of data transmission) talking to a data aggregation server (assume to have 1 server in this discussion) concurrently via HTTP. The server might run into a resource squeeze after N-th connection. Hence MQTT comes to the rescue. MQTT is an "archaic" protocol (invented in 1999 by scientist working for IBM), partially revived by engineers working in Facebook for the real-time messaging function
https://www.facebook.com/notes/facebook-engineering/building-facebook-messenger/10150259350998920/ . MQTT follows a PubSub model, where sensors subscribed to a "topic" to listen to control command or publish to a "topic" to stream data to the data aggregation server.
Some readers informed me of the broken URL to screenshots hosted off Dropbox. It seems Dropbox no longer support hosting resources directly with unique URL. Please download directly instead https://www.dropbox.com/sh/q0iclluewfx49fs/AAASt4Uw8GB4VgEuHGQPEJEta?dl=0
In this guide, several software components are needed, on top of the hardware component
Maker's IoT Kit for ESP8266.
Software needed
1. Ubuntu Server 14.04 on a physical computer or virtual machine on the cloud
2. MQTT protocol, the broker used here is mosquito MQTT http://mosquitto.org/
3. Node-RED as the data aggregation platform http://nodered.org/
The instructions to install the software on ubuntu is at the footer of this guide.
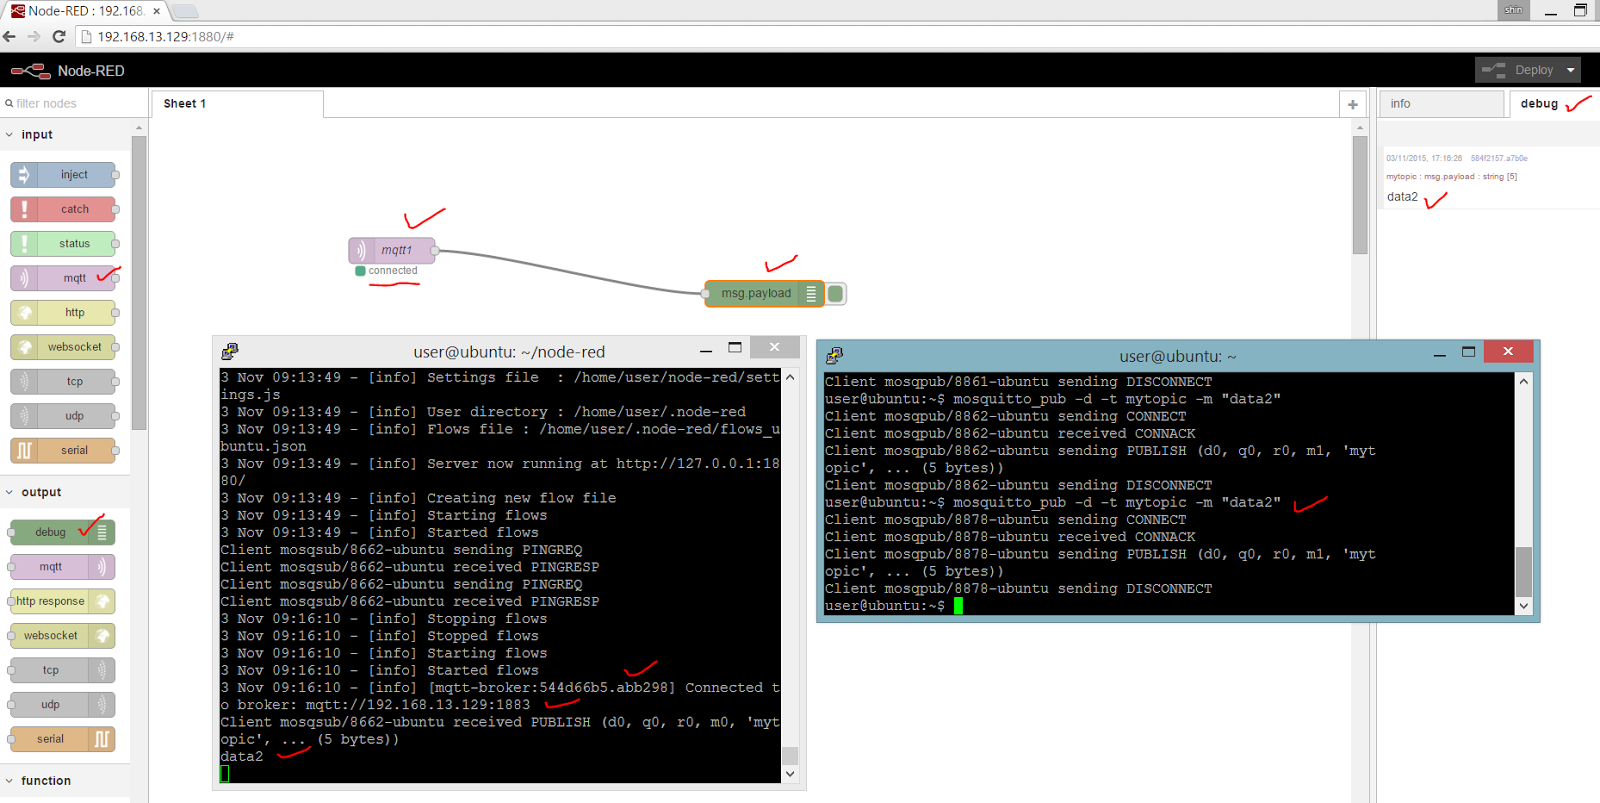
In the diagram above, the putty window on the right is the MQTT client, publishing data "data2" to the MQTT broker which is the putty window on the left. Node-RED is in the background, capturing the data transmission from MQTT client and MQTT broker, and it gives a visual on the "wiring" of the end to end IoT solution,
The Diagram follows the same arrangement as the previous, but with the addition of an ESP8266 enabled with temperature sensor to stream temperature data to thingspeak via HTTP, and to Node-RED via MQTT. We now have an end to end IoT Solution. but wait, it is unidirectional. the data only travels from the IoT sensor to the data aggregation server, but not the other way round. control needs to be issued from a server, just to complete the bidirectional communication possibly for an IoT solution.
Setting up the corresponding MQTT broker on Node-RED is very easy. simply drag the MQTT icon from the left hand side, and place it in the "canvas". edit the MQTT broker parameters accordingly.
Node-RED provides a visualization of IoT device, data aggregation, and it's connection, MQTT would function too. The above diagram describes the MQTT broker and the MQTT client in action.
The diagram above describes the Node-Red in operation, and the step by step guide to install additional "nodes" aka functionality to Node-Red
The diagram above describes the successful addition of a PID controller for Node-RED.
Are you thinking of what i am thinking? YES, cooking sous vide over Internet!! IoT sensor send the temperature of the cooking to Node-Red via MQTT. The computation of the PID based on the receive temperature data and the set point is offloaded from the ESP8266 to the Node-RED that is hosted on a virtual machine with much more muscle power as compared relatively. The delta, i.e turning on the heating element is the command to be sent from the computing platform to the ESP8266 IoT sensor that controls the relay.
The following diagrams describe the testing of the Sous Vide over Internet setup with Maker's IoT Kit for ESP8266, MQTT, and Node-RED
data aggregation and computation on Node-RED, data visualization on thingspeak
testing of the set point at 30degC
tuning parameters for PID
comparing the data output on serial from ESP8266, and Node-RED
asasdfa
ESP8266 MQTT and ThingSpeak code here:
Node-RED setup here: