Friday, December 25, 2009

merry christmas + happy new year

As usual, half day on christmas eve. The air-cond was turn off at 1pm and I am still in the office trying to get my things done. With my small little fan, it start to get cooler but not until the sun shine again. It became too warm for me stay in the office.

As usual, public holiday eve, there are people EVERYWHERE! I wanted to avoid the crowd, the aimless drinking and partying on the excuse that it is a public holiday eve. Wandered to Sim Lim Tower (SLT), I am sure the crowd there suits my palate. Walking in shop by shop to hunt for a temperature sensor for my new toy (some of you might heard it straight from the horse's mouth and want to be part of the action) but none avail. I was tempted to ripped off the temperature sensor on my motherboard. haha

Chance upon some kit set at B1 in SLT. wireless VU meter!!!!!!!! What is better to do then having a wireless VU meter to decorate my office!


Can't wait to open the kit set. So I hurry back to my office where all my tools are available. Spent the next 2 hours playing with another simpler VU that is passive. It is already 10pm....it is about time to head home.

=================================================================

Wakeup, exited about my wireless VU, here I am again in my Office. But to my dismay, the security guards locked the doors of the corridor that leads to my office, on christmas day! Hungry, eager to make my toy, frustrated because I have to wait and certainly not in a very good mood. Call them to unlock the corridor door.

I made the input ports and output ports detachable. Once I got the circuit running I want to hook it up to my headphone, my tshirt etc. Kinda cool when I am DJ-ing in the pitch dark with funky LEDs that lights up according to the sound pickup from the dance floor. Any SP-DJ kids want to loan my set? hehe


Here I present to you my toy for this christmas.

It reall rox!!!!!!!!!!!! check out the video

Monday, December 7, 2009

the dillemma of not preparing to tackle a challenge

Some time in July 09, sitting on the table for a casual dinner....

After a few drinks and merry making, I was dutch uncled by the boys and girls at the dinner table. 4 of the guys are regular marathon runners. 2 of the ladies run 10km regularly. I am the only "dude" that eat+drink as much (or more) then them but minus the physical exercise. Call it peer pressure, which I succumb to it willingly. Because i know that i need to exercise, if I want to see the moon again when I am 60 years old.

The next couple of day, I received an email telling me that i am participating in SCSM09 - HM. What? I never paid for it....Anyway, found out that my friends help me to register and I got to pay them back. 21Km, seems to be very loooooooooong ....... When I go to gym once in a very blue moon, I can't even complete a 2Km slow jog. Logically, 21Km requires 10x of the determination and effort.

Since then, my friends took turn to run with me. Usually we would run the perimeter of the campus. Because I ran so slowly and lack of motivation, they have to push me from behind both physically and verbally. Came to a point that it is abusing already. But I just smile at them and continue with my antics. Eventually, nobody would run with me anymore.....

Sounds familiar?????? It is like the studying for a subject. Especially subject that you do not like it very much or hated it completely nonetheless.

Fast forward to Dec09. With very little training (I only ran 10Km once in Aug, not even 4KM per weekly basis), I am having second thoughts of going for the run. I read the maps in detail, trying to look for an "escape route" along the path. I even have the thoughts of completing it "virtually", by tagging the chip on a stranger (by putting in their pocket or something like that). This lack of confidence is the true reflection of not preparing for the challenge. It is like exams is coming in few weeks time but did not study nor prepare for it. Sitting for the exam is simply for the sake of taking it and hope that will pass the exam by luck.

Usually I would over prepare before I take any exams. I actually look forward to take the exam and not the other way round. Somehow, this mental capability does not reflect on my physical capability. Or is it because of my lack of empathy to work out physically?

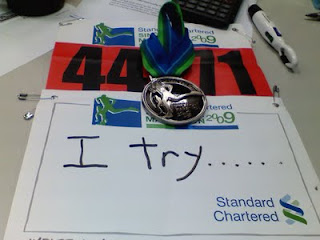
My friends run the 42Km marathon, they start as early as 5am. Leaving me alone waiting for my flag off. Thoughts of escaping keep seeping into me. The thoughts of running away is so strong. I start to make excuse such as I would hurt my self during the run, take photo as "COP" (Certificate of Participation),run for 2km and go home after that. Sounds familiar again??

This is the Fight or Flight Situation...

Until I met Mr.Seow warming up, have a chit chat with him and he gave me some positive reinforcement. We started together and jog the first KM together. He left, because I could not catch up with his pace.

At the 2nd KM mark, I can still jog albeit slowly. I kept jogging until the 5Km mark, where I met this uncle. He is 2x my age, had a mild stroke before and sharing his life changing experience with me and the reason that kept him moving. This resonates with the fear within me...We jog-walk-jog intermittently together. After the 7Km mark, I bump into Mr.Seow again.

Uncle was stopping at the first aid station to get some help for his knee pain. I am all alone again. Along the way, a few people gave me a pat of the back and keep encouraging me. At the 15Km mark, Andy bump into me. Tell me to try harder.

At the 17Km mark, blisters develop on both of my sole. It is really painful even to walk. Thanks so much to the $200+ running shoes. I kept jog-walk-jog, not wanting to lose the momentum. I knew once I sat down, I would call a cab to go home. I saw people that are bigger size, heavier and less healthy then me also keep moving forward.

Savor the last moment to the finishing line. Strangers enthusiastically cheering for strangers. Not forgetting the muscle ache after the run too!

Tuesday, December 1, 2009

New Year Resolution

It is around the corner again during this period of time, where you made some self reflections on the one year that have passed. Any of you still remembered what did I set at dec08?
http://shin-ajaran.blogspot.com/2008/12/new-year-resolution.html


Wasted 2009? Thinking of something you want to do but procrastinated/idled/let time pass by???? --> so passe, it was mentioned last year. haha


I, inevitable, procrastinated my way to the 100KG i am now. --> I am now 95KG, just measure it yesterday night. 


<<[2009 Goals]>>
1. Drop 1 Kg per Month   Tried but failed to do it. Otherwise I will be at 88KG now.


2. Participate in Sun Down Marathon 30th May 09   been busy "lah" (sounds so familiar right?) Anyway, i participating Standard Charted Marathon on 6Dec09


What are the caused of the failure of not achieving the goals?
Let's analyse the way my goals are set. Still remember my "SMART" goal setting technique?


When it comes to setting goals, be very sure the goals set are "SMART"

S= Specific / Simplified / Strategic
M= Measurable / Manageable / Money ?!
A= Achievable / Attainable / Agarlogic?!
R= Realistic / Relevant
T= Timely / Track-able / Traceable


What is missing from the above, is the how to's to achieve your goal. More importantly, a schedule on what to do that you can follow closely to achieve your goal. Since i did not paste on my wall my workout schedule as big as loan shark ah long's, hence, nothing is tracked closely and finally nothing happened. 


More importantly, I have made a promise to her that I would cut down 2KG per month. She did 5KG per month. Oh my goodness.....
As I told my boys and girls, you are only worth what you have promised. It is either you keep your promise, or not. Will I end up self-pwned? Lets see on dec 2010. I am actually looking forward to it. hhahaha


Monday, November 23, 2009

[warez] fun with plasma ball

Still remember my USB plasma ball toy? http://shin-ajaran.blogspot.com/2009/11/warez-usb-plasma-ball.html


I have decided to play around with it using a fluorescent light tube. But what worries me was the power rating of the usb plasma ball. It is running on 5V, 110mA from the USB. I am not sure whether it will work on a 2' 10W fluorescent light tube. Anyway, i got a 8W 6" fluorescent light tube for the repair man I bump into this repair man when i was conducting my lab session. He is kind enough to loan me for a while. thx man~


Wednesday, November 18, 2009

[warez] poor man's projector


Poor Man's Projector for Entertainment.

 I was toying with the idea of owning a projector at my pad. So that I can watch movie, play games, do word processing, write code on the BIG screen. It's year end nearing the corner and this is the time where all the "crazy" sales begin. But The projector's price still as "crazy". Ranging from s$1k and above for a XVGA ones with acceptable lifetime of the bulb. I should save my year end bonus for paying the education loan i have taken and pay for more important stuffs (buying a LV neverfull is never important! duh...), instead of splurging on warez.

  I am not going through the details about LCD technology, but here is where you can read more about it. http://en.wikipedia.org/wiki/Liquid_crystal_display. I love wikipedia!

By reading up on how LCD monitors are constructed. I could have remove item2 on the picture and replaced the back light with a light source from the OHP and "tahdah" my projector! There go my frenzy search for spoilt LCD and OHP. DO NOT THROW away your old warez, breath new life into them. Alternatively, you can donate it to me! hahaha. I would like to thank monir, pauline and chin hee for sourcing the written off items or faulty items such as the LCD, OHP and tools. Items are really old and chuck in a dark corner, until i salvage them. Proceed with care. Observe are safety requirements and bleed the voltage store in the LCD monitor before proceed by disconnecting from the mains and let it sit for some time, I do not have a professional bleeding circuit on hand nor i am making one. Too hazardous.... 

What I have used.
1. 1x Phillips Brilliant 105p 15" LCD monitor (FREE)
2. 1x OHP (FREE)
3. 2 wednesday afternoon (PRICELESS).


This is the LCD monir gets me. After removing the base stand from the LCD (requires some yanking and potential risk to crack the plastic housing), Unscrew the nut that holds the back panel to the LCD. Look out for the latch that hooks the lcd monitor housing in place. Usually, they come in a pair.


carefully lift the front panel cover after unlatching all the sides.


Remove the plastic front panel carefully, without damaging the hooks and latches.The black glass material in the picture above is the LCD. Handle with care.


This is the connector for the IO panel which the power button resides. Remove with care. It will be used again in the later part.
The push button and LED to the right is the power button and power led.


Carefully lift the black glass material that is hold in the metal frame. Here i used 2 screw driver as the lever to lift it up.


This is the reverse view of the panel lifted out. Inside the metal housing which sports the vga out, dvi out and the power socket is the controller board for the LCD. Basically power driver circuit for the back light and graphic display driver circuit for the LCD. The yellow ribbon cable is the ones we disconnected in the previous step.


Unscrew the screw that holds the metal housing together. In this picture it circuits mentioned above. On the right is our power driver circuit to the back light. on the left is the graphics driver circuit. Note the orange coloured ribbon cable. Remove with care, because we are using it. I use my smallest flat head screw driver to slowly pry it off.


clearer picture. I removed the metal plate below, thinking of putting it in my plastic hobby kit box (for insulation). But the cables are simply too short to handle. To save time and hassle, i just use back the plate. More about insulation later.


This is how the ribbon cable looks like after it is disconnected. Gently peel of the metallic sheet, the black foam separator. They are self adhesive on the LCD.


To remove the metal frame at the perimeter of the LCD from the panel is a little bit tricky. Because the metal pieces are bent towards the grove. So, just bent it the other direction as in the picture above.


This is how it looks like after the metallic sheet is lifted out. The white colored plastic frame have to be removed from the LCD. The PCB is green in colour. Do not scratch, break or remove any connections from the PCB. These are the data lines to light up each pixel of the LCD.


The screw in the above picture is the main hindrance for me to complete this project within the same wednesday afternoon. It is so small, such that all my screw driver bits will not fit. Luckily, pauline ,manage to source one from me. To the right is the connector to the LCD panel from the graphics driver circuit. To the left are the data lines connector. DO NOT REMOVE the plastic cover, those are the ribbon cable.


DO NOT remove the plastic cover that holds the ribbon cable. Unlatch the black latch to the white groove.


Behold, the LCD panel at all it's glory and the back light at the background.


we are using the lcd panel in black.


The OHP that chin hee get hold for me. It was dusty and littered with lizard poo. Got to clean it before use.

The next step is to snap the ribbon cable from LCD panel to the graphics driver circuit. Secure it somewhere to the OHP. I used 1 cable tie to secure it and laced some plastic sheet to provide some insulation. Assembly was a breeze. Please do not do it without supervision or safety precautions. 


Now, the viola moment. Or i have another paper weight on my desk?


Look ma, there is picture in the well~


The projection is not as fantastic. It have a yellow tinge on display. I guess the OHP is really aged. Time to change to a xenon lamp!


The end


Monday, November 9, 2009

[warez] USB plasma ball

After 3 weeks of agonizing wait, my usb plasma ball finally arrived~ yeaaayyyyyy!! 1 more coooool display in my office. I am another step closer to make my office into more disco-ish.

The best part of it, powered by USB, 5V and 110mA. Yet to try to power it with some dry cells. None to be found in my drawers. Arghhzzz

was discussing with yushan this morning, whether i can use his robo complete with the wheel to make a generator to power it. stay tuned


If you wonder what is plasma is all about, please read..


Wednesday, October 28, 2009

[DSA] posting of link in comment box

pls use HTML code

The following link is done with
www.google.com


<a href="http://URL" > the link < /a >


still figuring out how to post js in the comment box. as for entry, no problem encountered. If you have a solution to it, I did like to hear from you

Tuesday, October 20, 2009

[DSA] stun question Wk1


I came across this "game" when our department have a staff retreat at the Singapore flyer.
The objective of the game is to arrange staffs into 3 "E" characters.

Since this week our learning topics revolves around functions(), arithmetic evaluations, use of variables and proper programming methodology. I think it would be interesting to write a program to solve it. Anyway, during that period of time, access to a computer is a luxury. All equations have to be done on the paper. I manage to save this data in my memory and it is fresh still.

Attached is the screenshot of the piece of paper that illustrate the requirements.

Assume that the top and bottom horizontal bar is X, mid horizontal bar is (X-1) and the vertical bar is (X+1). Instinctively, this is a classic case where we can solve for X to the total number of staff and use it to form the "E". There is a possibility that there will be some staff remained, because we would want to maintain the uniformity of the 3 "E" characters.

3[(x-1)+2x+(x+1)] = total staff available.
which can further deduce to
12x = total staff available. => that is for forming 3 "E" characters.

Hence forming of 1 "E" character would be
4x = (1/3) staff available

The diagram below are not drawn to scale.

(x+1)
======== (x)
+
+
====== (x-1)
+
+
======== (x)

But how to translate the problem specs to code????????

we can use a divide and conquer approach to subdivide the problem into smaller portion.
Solving the algebra problem in the program might be redundant, since we have solve it on paper.

Some questions to ponder before start writing the code
a. what are the variables will be used.
b. do we need to use some form of data structure to store the temporary data?
c. what are the algorithms to calculate the X's, to display on the screen.

below are the sub-problem that need to be solve. drill down to further detail is not required.
1. Read in inputs from user for the number of staff available
2. Calculate how many will be left out from the E formation
3. calculate how many staff will form the top, mid and bottom horizontal bar
4. calculate how many staff will form the vertical bar
5. output to a screen

let the code and comments flow in!

Thursday, October 8, 2009

[DIY] Blinking LED bling belt buckle

Last Last week, attended one of my secondary school classmate's wedding. Btw, late Sept and early Oct I have already received 4x invites to wedding. More are in the pipeline..oh my goodnessssssss...........

Arghz, wedding reception is soOOooOoo boring. The food is usually not on par (mass produced), the alcohol is crazy (I'm in the brotherhood team, I'm used to blockade drinks targeting the groom.No drink driving please), lots of photo taking (I don't like to be the subject and I insisted to be photoshopped!!!! RAWRRR)

What totally grab my attention was my the first dish served, the cold platter. The lights are dimmed, Techno song was played (yeay!!!) and at the center of the dish there is this very "beng" blinking LED. It is in the shape of a dome, served in a cup of lightly coloured agar-agar (to give the light a medium to be illuminated). Quickly my I laid my paws on it before my bro daniel get to lay his! haha

Can' wait, I fished out my phone switch on the flash and tried to open the dome. But it is secured by screws! Well, I usually carry a handy tool set with me. No effort at trying to pry it open.

What drove me thinking was, how possible to pack 1 LED, some sort of controller/pic/MCU and battery cell small enough to fit into a dome shaped container at the size of a 20cents????

The content of the dome is just 1 LED and 2 button shaped battery (gives 3v). But, where is the controller???? Upon close inspection of the LED, i saw a tiny weeny black chip in the LED itself. That briefly explains the whole LED blinking sequences. My girl said I am "sua gu" (frog living in a well)...

well....I am pretty much exited with the "new" toy, open it up and find out that I can easily make 1 myself too without the hassle of wiring up a controller/MCU/pic and the considerations to make it small enough to be portable. The sample dome is in my office.

"Inspired" by this blinking LED, I was telling my trainees about this bling i going to make.
It is basically a belt buckle, complete with flashing LED.

Went Sim Lim Square (SLS) and Sim Lim Tower (SLT) last week for window shopping.

What?? Window shopping at SLS and SLT??? Not orchard ION, illuma? you gotta be kidding me!

Was hopping in and out of the shops in SLT looking for cool kit set and wares i can play with.
Chance upon this Flashing LED that cost 50cents each. They came complete default with flashing sequence, such that, there is no need to have a pic/MCU attached to the LEDs. Small is beautiful.

Initially, I only want to use 3v (button sized) to light up the LEDs, so all LEDs are wired in parallel circuit. Because there are too many branches and the current are divided at each branch of the circuit, it is not enough to drive the blinking LEDs. Normal LED are still OK. It Is in the circuit as a referencing point for the "beng-ness", lumens [brightness]. Actually, i only bought 10 of these. "LED not enough lar".

here I gave you my prototype belt buckle, 3v and 9v powered. Can spot the characters I am flashing?


Thursday, September 17, 2009

[wares] upgrading fujitsu e8410 with 500gb hdd on windows 7 x64 64bit OS


Last Monday, the 2.5" 500GB WD essential passport i owned was dissected, disassembled to retrieve the goodies in there.
http://shin-ajaran.blogspot.com/2009/09/wares-opening-wd-passport-essential-25.html

Now, the hdd itself is going to be transplanted on my fujitsu E8410 (otherwise known as FCS lifebook E8410 on non asia pacific market). The E8410 is 2 years old, 160GB hdd, 4GB DDR2 ram and sports a CPU that support virtualization technique. It is the perfect candidate to upgrade it to an OS that uses 64bit architecture!


This is the back view of the laptop, bottom up. There are 10 screws to be removed, to get access to the HDD. The location of the HDD is the medium size box at the lower portion of the image above.
Disclaimer: It is your risk financially, liability (void warranty) to open up / disassemble your warrez!!

1. Remove the battery
2. Remove the optical drive
3. Unscrew the nuts that fasten on the cover
4. Lift up the hood!

The whole casing have to be lifted up. Check out the video below~!


[youtube]x_RF8FKKn2Q[/youtube]


A peek under the hood of my E8410

the HDD is located at the position of the grey box. It is protected by a metal cover, which need to be removed to get access to the HDD.


Close up shot on the CPU, a T7300


Close up shot on the HDD, A fujitsu 160GB beneath the metal cover.

1. Unscrew the HDD metal cover that is secured to the laptop.
2. Unscew the metal cover that is secured to the HDD.


The 160GB HDD that is going to be swapped into the WD passport essential casing.

Now, get my paws on the 500GB hdd!


Replaced the newly removed 160GB HDD into the connector


Now, put back the cover and secure *ALL* screws that was from the laptop :0)


Here come the win7 x86 installation part.
1. Get your hands on a copy of the OS. You can download from MSDN AA if you are a student of an academy affilicated with m$

2. Get your CD key from the local admin.

3. Setup bios to enable vituarlization. Need to turn this on to use the m$ virtualPC and the famed XP mode. Its RoXoR!!!!!


4. SOP install


5. Enjoy the goodies~~!


Monday, September 14, 2009

[wares] opening the wd passport essential 2.5" 500GB HDD

[youtube]C9wnJz-ZPrA[/youtube]


1. gently pry at the sides of the WD passport essential 2.5".
1.1 Use your fingernail/screw driver/card

2. gently lever at the rounded edge, one side at a time

3. pull out the white colour plastic piece gently.

4. Remove the shock absorbers (4pcs total)
5. gently slide the 2.5" hdd out of the aluminium housing

6. There you have a 2.5" WD 500GB hdd. HDD alone retails at s$138 at SLS, comex is selling at $119 for wd passport essential 2.5" 500GB

Monday, August 3, 2009

[DSA] Feed back~~~

Feedback about me, my style, what have you learned from me. Not forgetting what you want me to improve on for the lessons conducted. Btw, slimming is not one of the expected answer from you.

Wednesday, June 17, 2009

[DIY] 3x3x3 LED cube

Saw some really cool 3x3 led cube. It might just be the "it" decoration for my office to make it a more disco-ish setting. Grab some LEDs and components from the store and lets get cracking. My apologies for the late posting, was rather caught up recently.

The design concept I wanted is the cube got to be detachable. So any time I am bored with the colours, or I got my hands on some RGB LEDs, min effort is needed to mod the LED cube. If every thing is soldered down, there is not much flexibility. Thus, I gotta make another cube. I did have something that is pluggable, upgradeable and easy to modify.

time: 2 Hr (fashion the cube and soldering) 2Hr(making of vectorboard, jumper wires to MCU), programming the MCU (timeless)

To make fashioning of the cube easy. I made 9 holes on the cover of a paper box. This will make the bending of the LED pins easy. Make sure you align the cathode and anode accordingly. We will be folding the cathode together.


This will what you will have after fashioning 3 layers of 3x3 LEDs.


About the detachable design, it was excuse for me not to solder it. I don't really like to do soldering job. The fumes just make me nauseous. So, I used some PCB jumpers. This are commonly seen on HDD and CD roms / DVD roms to select the master / slave mode. There go the frenzy to look for OLD hdds and optical drives to salvage those jumpers. Later, because of the use of PCB jumpers, some problem occurred which I will elaborate later.


Solder the layers on a vector board or strip board. Your choice. Make room for the jumper pins. Here I choose to light up a layer by pulling the cathode to ground and the individual Led by the 3x 3pins to high. The trick here is to pull an optical illusion on the viewer. Human vision will not notice flicker that is above 100Hz. Moving pictures of 27 frames per seconds make it a video. We shall use this concept when programming. Hence each layer are light up with a certain combination at a certain "refresh rate" to create the illusion of moving/running lights pattern.


Hook up the led cube to the MCU. I am using a PIC16F4220F out of convenience. It is the only available MCU on my desk. you can use ARM, other PIC etc.


Before all the programming rush, we need to ensure all the LEDs are working properly. A diagnostic sequence need to be run by simply light up all the LED. For my cube, not all LED light up accordingly. When I move the individual LEDs slightly, they light up and dimmed. Intermittent lighting is not what we wanted. The problem might derived from the design that uses PCB jumpers instead of solder everything.


Now, in a split for a decision. Should it be soldered, loose the ability to be modify easily or find another method to achieve the hack-ability.

Akan Datang....................

Interested to continue where I left? Buzz me.